
There’s nothing quite like the aroma of fresh sourdough focaccia straight from the oven—golden, blistered edges, tender airy crumb, and that irresistible olive oil sheen. This recipe is designed for home bakers who crave crispy edges, finger-dimpled bubbles, and herb-infused pockets of flavor without spending hours kneading dough. Using a high-hydration sourdough, generous olive oil, and a simple cold overnight retardation, you’ll get bakery-level focaccia in your own kitchen.

Ingredients and Tools
Ingredients:
- 500g all-purpose flour
- 375–400g water (75–80% hydration)
- 100g active bubbly sourdough starter
- 10g salt
- ¼–½ cup extra virgin olive oil for pan and topping
- Fresh rosemary needles, optional
- Flaky sea salt for finishing
Tools:
- 9×13 metal pan (preferred for crisp edges)
- Mixing bowl
- Rubber spatula
- Kitchen scale
- Oven thermometer for precise 450°F baking
High hydration traps steam during baking, creating that airy interior, while the olive oil pool in the pan fries the edges for that signature crisp chew.

Step 1: Mix and Autolyse
- In a mixing bowl, combine flour, water, and sourdough starter.
- Mix until a shaggy dough forms.
- Let rest 30 minutes to 1 hour (autolyse), which strengthens gluten naturally.
After resting, add salt and gently incorporate. The dough will be sticky and slack—this is perfect for focaccia.
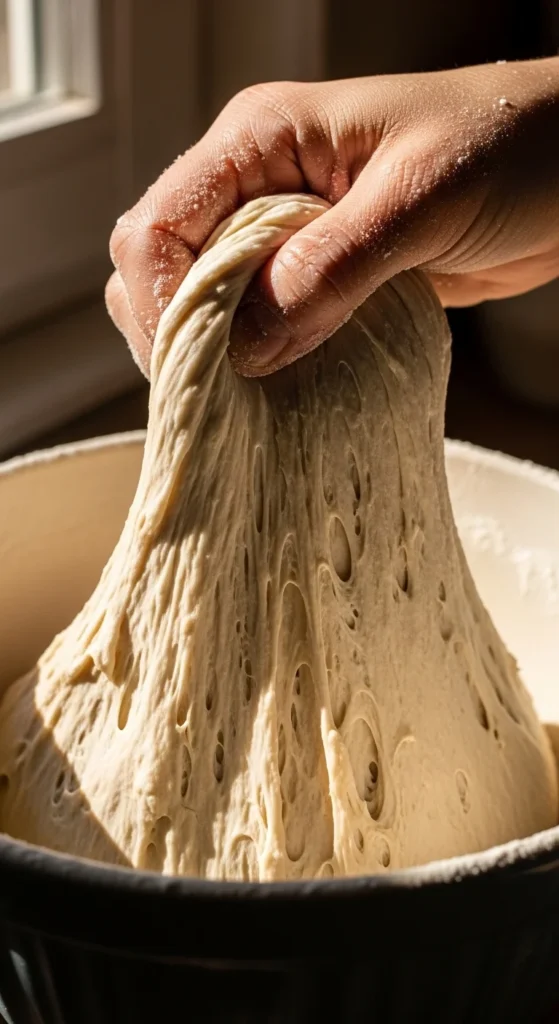
Step 2: Stretch and Fold
Instead of kneading, use 3–4 stretch-and-fold sets over the next 1–3 hours.
- Wet your hands to prevent sticking.
- Grab one side of the dough, stretch it up, and fold it over the center.
- Rotate the bowl and repeat on all sides.
This builds structure while maintaining the airy texture.
Step 3: Cold Retard Overnight
Transfer the dough into a well-oiled 9×13 pan. Use ¼–½ cup olive oil to coat the bottom so it pools around the edges.
- Cover tightly with plastic wrap.
- Refrigerate 12–24 hours for cold retardation, which slows fermentation, strengthens gluten, and enhances flavor.
Cold overnight proves make the interior tender while the edges crisp beautifully in the oven.
Step 4: Finger Dimpling and Herb Finish
Remove the dough from the fridge and let it come to room temperature for 30–60 minutes.
- Press your oiled fingers deep into the dough to create dimples.
- Pour a little olive oil over the top and press it into the indentations.
- Sprinkle fresh rosemary and flaky sea salt.
This aggressive dimpling traps the oil, forming bubbly pockets and crispy edges during baking.

Step 5: Bake for Golden Crispiness
Preheat your oven to 450°F, placing the pan on the bottom third or a baking steel for maximum edge crisp.
- Bake for 20–30 minutes until golden brown.
- Internal temperature should reach around 200°F for perfect doneness.
Optional: add garlic cloves or cherry tomatoes in the dimples for a flavor twist.

Step 6: Cool and Serve
Allow focaccia to rest for 10 minutes on a cooling rack. This sets the crust and keeps the edges crisp.
Slice into squares or rectangles and serve warm. Pair with olive oil for dipping, use in sandwiches, or enjoy as a side to soup or salad.

Tips for Success
- Hydration matters: 75–80% keeps the crumb light and airy.
- Oil pools = crisp edges: Don’t skimp on olive oil in the pan.
- Finger dimple deeply: Shallow dimples won’t trap oil for blistering.
- Cold retardation: Overnight fridge fermentation is key for flavor and structure.
- Jiggly proofed dough: The dough should wobble slightly when ready—avoid overproofing.
- Pan choice: Metal conducts heat better than glass for bottom crisp.
Variations
- Parmesan sprinkle for extra umami crunch.
- Cherry tomatoes and garlic pressed into dimples for a savory, juicy topping.
- Mixed herbs like thyme or oregano instead of rosemary.
Crispy-edge sourdough focaccia is a perfect balance of crunchy, airy, and flavorful. With this method, you get bakery-quality results at home without complicated kneading or lengthy prep. Save this recipe, grab your sourdough starter, and enjoy your crispy, chewy, herb-infused focaccia any day of the week!

Leave a Reply