
There’s a huge difference between watery stock and a deep, rich broth that makes every spoonful taste like it came from a restaurant kitchen. The secret isn’t expensive ingredients — it’s technique.
When you roast aromatics, layer umami boosters, simmer slowly, and finish with a splash of acid, basic stock transforms into a deeply savory base you’ll want to keep on hand all year. Let’s walk through it step by step.
Start With Roasted Aromatics
If your broth tastes flat, this is usually the missing step.
Roasting vegetables at 400°F for 25–30 minutes caramelizes their natural sugars and builds a sweet-savory foundation.
What to Roast:
- 2 onions (quartered, skins on for color)
- 2 carrots (chunked)
- 2 celery stalks
- 1 whole garlic head (halved)
- 1–2 tablespoons tomato paste (spread lightly over veggies)
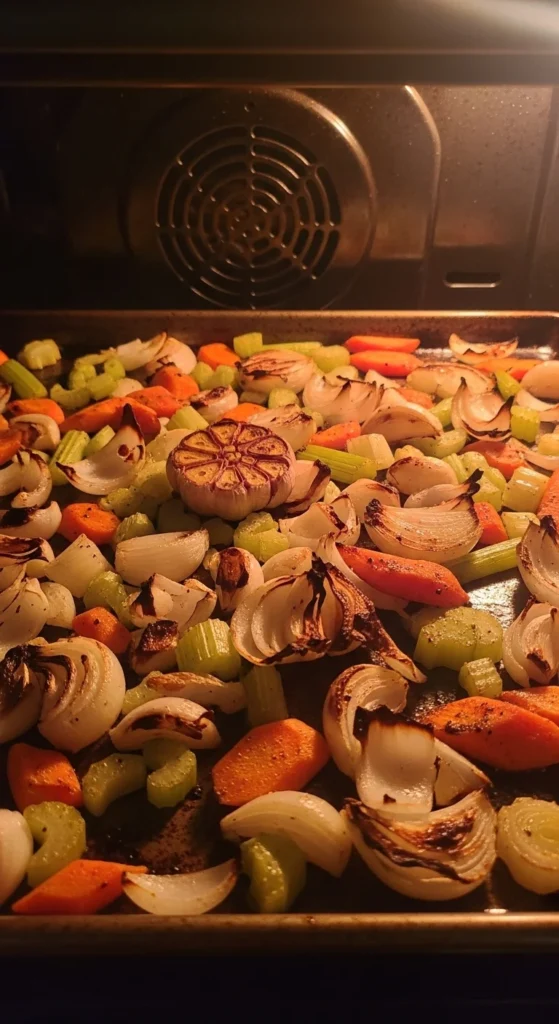
Why Add Tomato Paste?
Tomato paste adds concentrated umami and deep color. When roasted with vegetables, it develops a slightly sweet, savory intensity that carries through the entire broth.
Roast until edges brown but don’t burn.
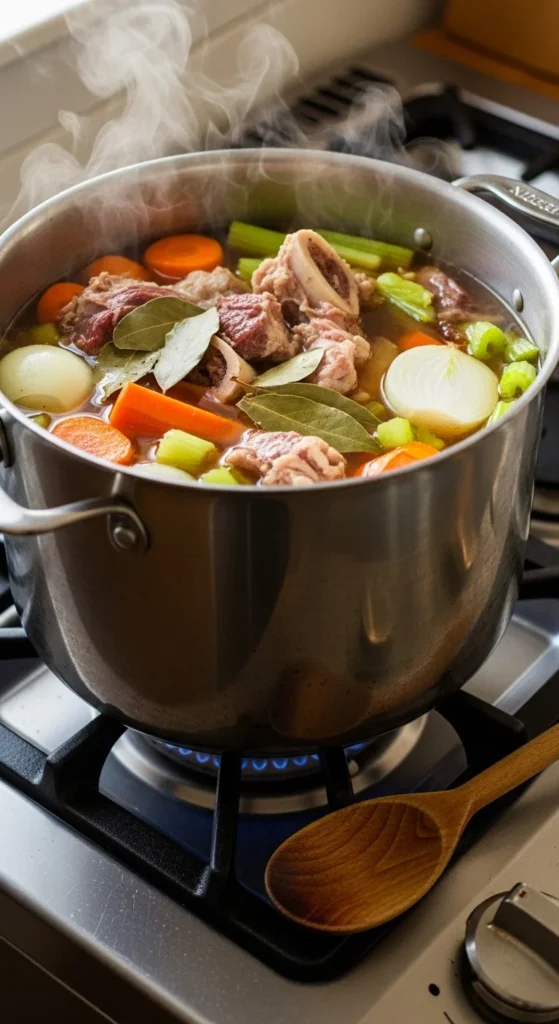
Cold Start for Clear, Clean Flavor
Once roasted, transfer everything to a large pot.
If using bones (chicken carcass, beef bones, or ham hocks), place them in the pot first. Always start with cold water.
Why Cold Water?
A cold start allows proteins to release slowly, which helps prevent cloudy broth.
Cover ingredients with water by about 1–2 inches.
Add Herbs and Build Layers
This is where depth really develops.
Tie together a simple bouquet garni:
- 2 bay leaves
- 3–4 sprigs thyme
- A handful of parsley stems
- 10–15 whole peppercorns
Drop it into the pot.
You can also add:
- 2–3 parm rinds
- A handful of sliced mushrooms
- 1 tablespoon soy sauce or miso
- 1 tablespoon nutritional yeast (for vegan broth)

Why Parm Rinds?
They slowly dissolve and release a subtle savory note without making the broth cheesy. It’s one of the easiest ways to add depth using something you’d normally discard.
Simmer — Don’t Boil
This step makes or breaks your broth.
Bring the pot just to a gentle bubble, then reduce heat immediately.
You want a low simmer (around 160–180°F), not a rolling boil.
Timing Guide:
- Vegetable broth: 1½–2 hours
- Chicken broth: 2–4 hours
- Beef broth: 4–6 hours
- Bone broth (extra gelatin): 12–24 hours
A slow simmer allows collagen to convert into gelatin, giving broth that silky mouthfeel.
Skim for Clarity
During the first 30 minutes, foam may rise to the surface.
Use a ladle to skim it off.
This small step keeps the broth clean-tasting and clear instead of muddy.
Deglaze for Extra Depth
If you roasted bones or vegetables on a sheet pan, don’t forget the browned bits stuck to the pan.
Place the pan over a burner or add ½ cup hot water or white wine and scrape with a wooden spoon.
Pour that liquid gold straight into your pot.

That fond is packed with concentrated flavor.
Reduce for Concentration
After simmering and straining, taste your broth.
If it tastes light, return it to the stove and reduce by one-third to one-half.
Reduction thickens texture slightly and intensifies savoriness without adding salt.
Brighten With Acid
Right before serving or storing, add:
- 1–2 teaspoons lemon juice
- A splash of white wine
- Or a few drops of vinegar
Acid balances richness and wakes up the entire pot.
It won’t taste sour — it simply sharpens flavor.
Strain Like a Pro
Use a fine mesh strainer for best clarity.
For ultra-clear broth, strain twice or line the strainer with cheesecloth.

You’ll be left with beautifully clear, golden broth.
Smart Storage Tips
Don’t let your hard work go to waste.
- Cool completely before storing.
- Refrigerate up to 5 days.
- Freeze up to 3 months.
- Pour into ice cube trays for small flavor cubes.
Broth cubes are perfect for:
- Pan sauces
- Rice dishes
- Stir-fries
- Quick soups
Just pop one out whenever you need a hit of savory depth.
Fixing Common Broth Problems
Watery and bland?
- Roast vegetables next time.
- Add tomato paste or mushrooms.
- Reduce longer.
Cloudy broth?
- Start with cold water.
- Avoid boiling.
- Skim early foam.
Bitter taste?
- Heat was too high.
- Vegetables may have burned.
The Takeaway
Homemade soup broth doesn’t require complicated ingredients — it’s all about layering flavor the right way.
Roast vegetables first.
Simmer gently.
Add umami boosters.
Balance with acid.
Reduce for depth.
Once you try this method, store-bought broth won’t compare.
Save this guide, simmer a batch this weekend, and keep a stash in your freezer for soups, stews, and cozy meals anytime.

Leave a Reply